Burning subtitles into a Bink Video File (.bik)
While working on the Czech localization of Enderal: Forgotten Stories, I needed to burn subtitles into a .bik video. Upon realizing there isn't a guide on how to do this on the internet yet, I decided to write this article. Note that there may be other, simpler methods. Also, this guide is for Windows users; however, with some adjustments, it should still be possible on other operating systems.
Note: It might be a good idea to backup your input files just in case.
Goal
Input files
.bikvideo file.srtor.txtsubtitle file
Output file
.bikvideo file with subtitles burned into it
Required programs
- FFmpeg (Install via this article, tested version 2023-05-31)
- Optional: VLC Media Player (Download here, tested version 3.0.18)
- RAD Video Tools (Download here - Mind the password, tested version 2025.01)
Process Overview
- Convert
.bikto.mp4using FFmpeg - Generate
.wavfrom.mp4using FFmpeg - Convert
.srtor.txtto.assusing FFmpeg - Optional: Configure
.assformatting - Burn
.assinto.mp4using FFmpeg - Convert
.mp4to.bikusing Rad Video Tools (with sound compression turned off) - Add sound from
.wavto.bikusing Rad Video Tools
Detailed Guide
0. Prepare files
To make the process easier, put both the initial .bik video file and the .srt or .txt subtitle file in one folder together.
1. Convert .bik to .mp4 using FFmpeg
To convert a Bink Video File (.bik) to .mp4, we will use FFmpeg. First, open the Command Prompt and navigate to the directory where your input files are located using the cd command. For example:
cd "C:\Program Files\" (or D: and then cd "D:\Program Files\" if navigating to a different drive)
You can then convert the .bik video file using:
ffmpeg -i "input.bik" -c:v libx264 -preset fast -crf 23 -c:a aac "input.mp4"
(replace input.bik with the name of your .bik file)
Setting the crf value (default = 23) lower will make the output .mp4 video higher quality at the expense of its size (0 = lossless but largest file size).
2. Generate .wav from .mp4 using FFmpeg
You will also need a .wav sound file for later. You can generate it from the .mp4 you just created using:
ffmpeg -i "input.mp4" -acodec pcm_s16le -ar 44100 -ac 2 "output.wav"
3. Convert .srt or .txt to .ass using FFmpeg
Next, you will need to convert your subtitle file to an .ass file. Note that this subtitle file should already be filled and in accordance with the SubRip file format.
For an .srt file, the command will be ffmpeg -i "input.srt" "output.ass"
(replace input.srt with the name of your .srt file)
For an .txt file, the command will be ffmpeg -i "input.txt" "output.ass"
(replace input.txt with the name of your .txt file)
4. Optional: Configure .ass formatting
The .ass subtitle format supports a wide range of customization. You can edit the subtitles directly in Notepad and preview them in the VLC Media Player.
5. Burn .ass into .mp4 using FFmpeg
If your .ass subtitles are ready to be burned into your video, you can do so using this command:
ffmpeg -i "input.mp4" -vf "ass=output.ass" "output.mp4"
Note that this step may take up to several minutes.
6. Convert .mp4 to .bik using Rad Video Tools (with sound compression turned off)
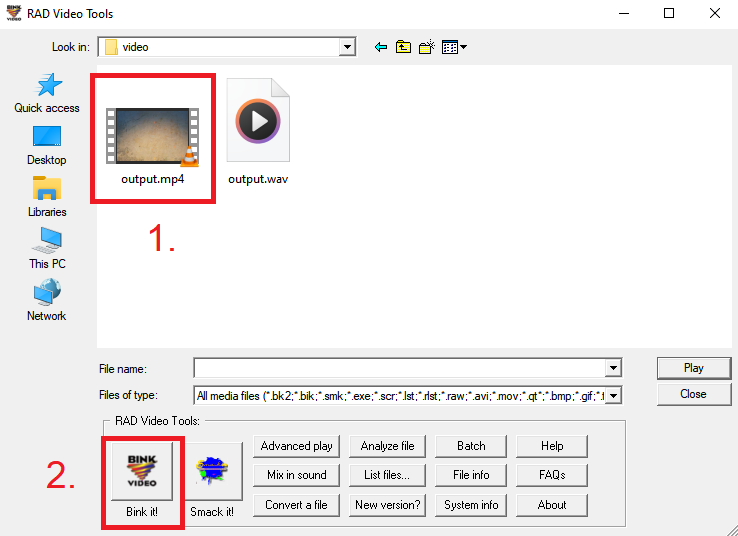
After you extract the .7z file using the password and installing Rad Video Tools, open it and navigate to your directory inside the program. Then, select output.mp4 and press Bink it!, as shown in the image below:
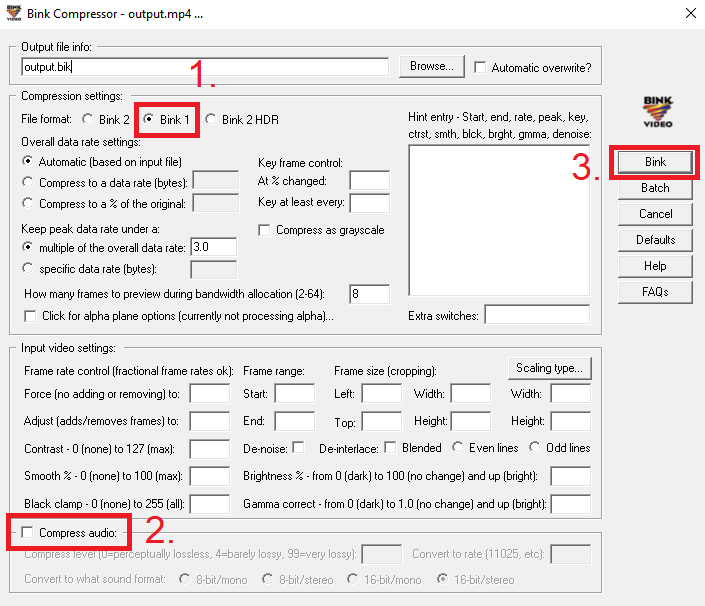
In the new window, make sure that the Bink 1 file format (AKA .bik) is selected and that the Compress audio checkbox is unchecked (When left checked, the generated .bik file will have just static noise instead of the original audio, not sure why this is). After that, press Bink, as shown in the image below:
Note that this step may take up to several tens of minutes or even hours if the video is especially long (> 10 min).
After the compression is finished, close all RAD Video Tools windows.
7. Add sound from .wav to .bik using Rad Video Tools
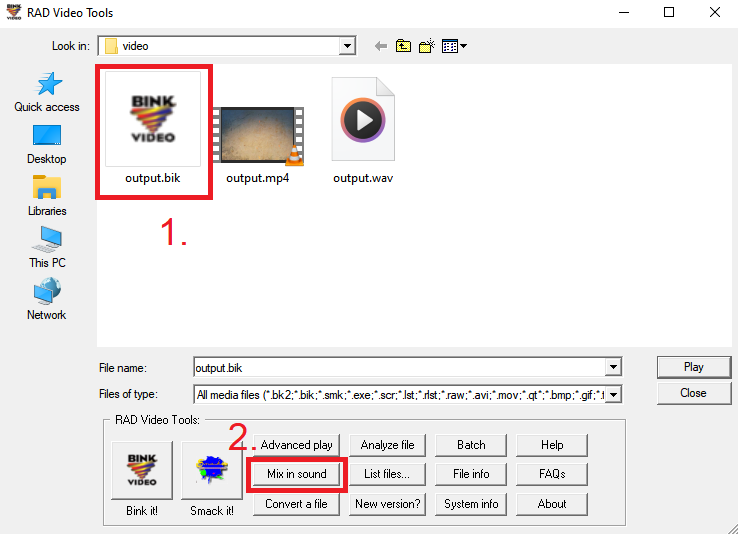
Now, open RAD Video Tools once again and navigate to your directory inside the program. Here, select the newly generated output.bik and click Mix in sound, as shown in the image below:
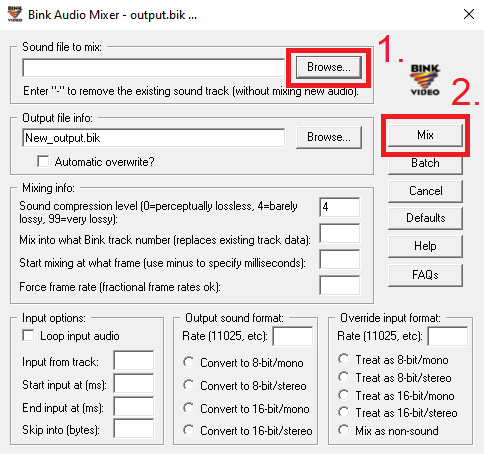
In the new window, click Browse, navigate to your directory and select output.wav. After that, press Mix, as shown in the image below:
You can also adjust the Sound compression level to reduce file size or improve audio quality, depending on your needs.
After the sound mixing finishes, close all RAD Video Tools windows.
Conclusion
You should now be left with a file called New_output.bik in your directory. RAD Video Tools also provides a Bink Video File player, so you can check if the process was successful.
Created on March 20th, 2025